


Mike Tuke’s

FAULTING

www.earth-science-activities.co.uk


Structural Geology
Faulting
Types of movement
A P 5 min
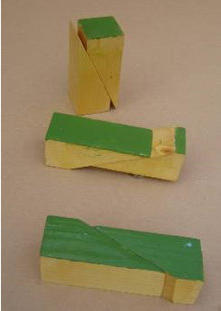
Students are given blocks of wood 10cm by 5cm by 5cm cut in two obliquely. They are told to
keep the oblique faces touching each other and to move the one block while holding the other
still. They should be able to list 4 different sorts of movement, sideways, up/down, diagonal
and twisting.
Magnetic faults
D F
Shapes are cut from cardboard and magnetic tape stuck on the back. These can be moved to
show the strata before and then after faulting.
Edible faults
A I 2 min
As a treat at the end of a lesson students are given slices of cake, a knife, a small piece of
wood and a label saying which type of faults they must make.
Wooden blocks
D F
Wooden blocks 15cm by 10cm by 7cm, painted with horizontal strata and cut obliquely are used
to show the movement during the different types of faulting: normal, reverse, wrench, thrust,
scissor movement etc.
Faults on photos
A P F 1min per photo
Students are given photos of the different types of faults. The photos should have scales on
and say if they are side or vertical views. Students identify the types of fault and give the
displacement.
Composition of the fault breccia
Pa P 5 min
To show how the composition of the fault breccia relates to the strata.
Students draw the diagram below and fill in where they expect to find samples of beds a, b and
c in the fault breccia.
Age of beds above and below a thrust fault
D or I 5 min
Students draw horizontal strata on an A4 paper in landscape position. The strata must be
labelled with “a” oldest and b, c, d etc. They then cut the paper along a low angle diagonal line
and move one part as though it was a thrust fault. Students note the new sequence of beds
showing older beds over younger ones.
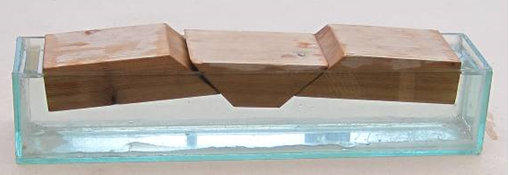
Rift valley blocks
D
A piece of wood 30cm by 10cm by 5cm is cut into three pieces and these are placed in water.
Initially they are held together. When they are released a rift forms.
Magnetic rift valley and horst
D F
To show the formation of rift valleys and horsts through tension cut card into the shapes
below and stick magnetic tape only to the end and central pieces. All the pieces are placed on
the magnetic blackboard or metal sheet. When the end pieces are pulled rift valleys form
either side of the horst.
Wrench faults
D
Two blocks of wood 20cm by 10cm by 3cm with a red line (= a dyke) going across each block
half way along. Place the blocks side by side so that the dyke is continuous across both blocks.
Move one block to left or right to demonstrate dextral or sinestral movement.
Magnetic wrench faults
D F
To demonstrate the movement of the Great Glen Fault a map of Scotland with the Strontian
and Foyers granites and the Moine Thrust marked on is cut along the Great Glen Fault. It is
then mounted on card and magnetic tape is stuck on the back. The same can be done for the
San Andreas fault.
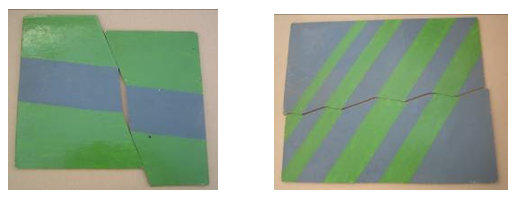
Sinestral and dextral wrench faulting.
A P 5 min
Students sometimes think that the sense of throw will be different when viewed from the
other side of a wrench fault. This is to show them it is the same which ever side one stands on.
Students draw a wrench fault cutting and displacing a dyke. They then either turn the paper
through 180o or move to the other side of the desk and note that the sense of throw is the
same.
Measuring the displacement along the Great Glen Fault
A I 5 min
Students are presented with an A4 photocopy of a map of Scotland with the Foyers and
Strontian Granites, the Moine thrust and the Great Glen Fault marked on. They cut the map
along the Great Glen fault and then measure the displacement and state whether the fault is
dextral or sinestral.
Measuring the extension caused by normal faults
A I 5min
Students are given a photo or diagram. First they measure the horizontal length. Then they cut
the paper along the fault lines and move the pieces so that the strata are continuous and not
faulted and then measure the length again. The difference is the extension caused by the
normal faulting.
Nappe and Klippe
D or P 2 min
To demonstrate the formation of nappes and klippes take two pieces of A4 paper or thin card
with the end 3cm folded over. Start with the folded pieces touching so they look like a fold.
Then move them so that a thrust develops between them (nappe), then further apart (klippe).
Thrusts and folds
D
Use a sheet of thin A4 card to show how folds may be replaced by thrusts. The relationship of
wrench faults and folds can be shown in the same way.
Stresses and faults
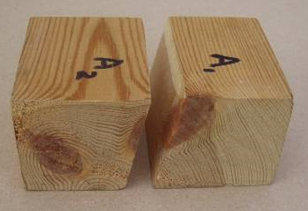
A P F 15min
To show how the orientation of Pmax, Pmin and Pint determine the type of fault formed.
Students are provided with a ball of plasticine 1cm diameter, three blocks of wood 10cm by
10cm by 5cm cut as shown in the photo and with the top surface stained green.
Students squeeze the plasticine between thumb and finger to illustrate that the direction of
maximum pressure results a reduction in thickness and the direction of minimum pressure is
the direction of extension.
They then use their wooden blocks to work out which is the direction of thinning and therefore
maximum pressure Pmax and which is the direction of increase in thickness and thus Pmin for
normal, thrust and wrench faults.
Crustal shortening and wrench faulting
D F 5 min
To show how the crust is shortened by movement along a series of intersecting wrench faults a
piece of board 25cm by 15cm by 2cm has lines dawn across it to represent bedding and is then
cut into a series of diamonds. The pieces are arranged between two strips of wood and the
strips are then pushed towards each other causing movement along the wrench faults and
crustal shortening in the direction of Pmax and extension at right angles to that.
The beer can experiment
D F
To show how pore pressure can reduce the pressure needed to cause thrusting place a piece of
glass 30cm by 30cm in a tray or on the edge of a sink, Obtain two open-topped cans. One can
has 1mm holes punched into the bottom so the water in it can exert a pressure on the
underlying glass. Wet the surface of the glass. Fill both cans with 2mm sand and then with
water and immediately place them on the glass. Tilt the glass to see which can slides first.
Gaps formed during normal faulting
D
To show how gaps form during normal faulting when the angle of the fault plane is different in
different strata. This explains the occurrence of mineralization and of fault breccia in normal
faults. Use a sheet of A4 hardboard painted with strata and cut along a fault plane whose angle
changes with the strata.
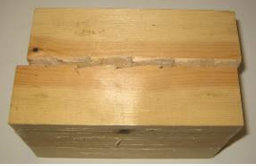
Slickensides and direction movement
D
This demonstration is to show how the scratch marks give the trend of movement but the
actual direction of movement can be determined from the steps.
Two blocks of wood 5cm by 10cm by 15cm with steps cut on the larger face of each block using
a planer. Make scratch marks on the opposite side of each block. Initially put the blocks
together with the scratch marks touching. Move the blocks to show that scratch marks could
be caused by movement in either direction. Now put the blocks together with the steps
together and try to move them in both directions. The steps only allow movement in one
direction.
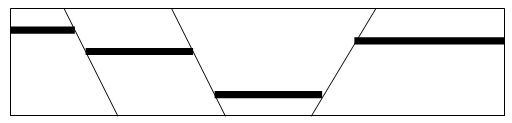
Wrench faults and the formation of sedimentary basins D
This model is to show how the movement along wrench faults can cause sedimentary basins, as
has happened along the Sticklepath fault in Devon
and the Dead Sea. An A4 piece of wood cut with a jigsaw in the pattern shown below.
Start with the two blocks together and then move them sideways.
Shearing and tension gashes
D or P 10 min
Place a ball of putty about 5cm in diameter on the junction of two A4 pieces of hardboard
rough side up. Press the putty down until it is a disc and press a strip of wood 1cm wide into it
at right angles to the join between the pieces of hardboard so that when removed it leaves a
shallow depression. Now, keeping the two boards in contact, move one board like a wrench
fault. Observe the thinning of the depression as the putty shears and the eventual
development of tension gashes.
Omission and repetition of strata
E or D F 20 min
This experiment is to determine the relationship between the angle of dip of the strata, the
type of fault and the occurrence of repetition and omission.
It can also be used as a demonstration to show how faulting causes repetition or omission of
strata both on the surface and in boreholes and how the dip direction and type of fault
determine whether omission or repetition occur.
Bending of strata
D or I 2 min
To demonstrate the bending of strata prior to faulting press your finger tips together with
your arms horizontal, left palm facing up and the right down. Move your left arm down keeping
your fingers touching.


Earth Science Activities and Demonstrations