


Mike Tuke’s

FLUME

www.earth-science-activities.co.uk
MAKING A FLUME
The requirements and instructions that follow may need to be modified if your plastic tank or
pump or any other component is of a different size. Use your own judgement.
Requirements
1 Glass tank
1 Domestic central heating pump
2 22mm tank connectors
Plastic tank approximately 40cm by 35cm by 20cm
2 Jubilee clips suitable for 22mm pipe to join flexible pipe to copper tube
Sections of 22mm copper pipe: 1 piece 5cm long and one 20cm long
Flexible plastic pipe 22mm internal diameter 1.5m long
Pebbles about 1 litre of about 2cm diameter to fill end section to stop the water squirting up
into the air
9 glass strips 10cm by 1cm by 4 mm to hold the gates in place
6mm glass 9.8cm by 7.5cm as a gate at the top end
2 pieces of 6mm glass 9.8cm as a gate at the bottom end, one 2.5cm high and the other 5cm
high
1 wood board 25cm by 2.5m by 25mm for the base
6 door stops to support the base
1 piece of wood 1.95m by 12cm by 2cm for the base of the cradle
2 strips of wood 1.95m by 5cm by 2cm for edge of the cradle
1 strip of wood 12cm by 5 by 2cm for the edge of the craqdle
2 pieces of wood 30cm by 25cm by 2.5cm to support the cradle
4 blocks of wood 10cm by 5cm by 5cm to hold the cradle supports
Rubber sheet 1.95cm by 12cm by 2mm to go under glass flume
Sand 8 litres with a grain size of less than 0.25mm. Play sand for sandpits is often fine enough
and can be bought from building supply companies
Wooden blocks 15cm by 10cm and several different thicknesses to raise the flume
Glass tank
A glazier can make this for you. The glass tank should be made from 10mm glass and should
have an internal size of 2m by 10cm by 10cm. It should be open at one end. At the other end
there should be a hole in the bottom centred 5cm from the sides and 7.5cm from the end. It
should have a diameter of 3cm so that a 22mm tank connector will fit in it.
15cm from the end with the hole two of the glass strips should be glued to each side so that
the 6mm glass piece 7.5cm high can slide into the slots. Another 4 glass strips should be glued
to the other end 2cm from the end so that the other 6mm glass piece can be slipped in as a
gate. The last glass strip should be glued to the underneath of the open end of the tank 1cm
from the end to stop water running back.
Screw the tank connector into the hole. Fit a short piece of copper tube to the tank connector
so that it projects below the flume.
Plastic tank
Drill a 3cm hole in the centre of one end of the tank 1cm above the base. Insert a tank
connector into the hole and the long piece of copper pipe.
Base board
Screw 4 door stops at each corner and two in the centre as supports.
Cradle for the flume
Make a circular hole in the board 5cm in diameter and centred 7.5cm from the end. Screw the
1.95m by 5cm by 2cm strips to the edge of the board and the smaller piece to the end with the
hole. Place the rubber on the board between the edges and cut a hole in it in the same position.
Supports
Cut the wood into this shape. The width “a” should be wide enough to take the glass flume and
base, that is about 16cm. “b” should be 2cm more that the height of the plastic tank. The
bottom cut out should be large enough to take the copper pipe, about 5cm by 5cm. Two blocks
are used to fix the first support to the base board next to the plastic tank.
The second support is fixed to the base board using the other two blocks about 10cm from the
top end. The supports hold the cradle level and stop it from moving sideways.
Assembling the flume
1.
Place the plastic tank on the end of the base board and hold it in place with wood pieces
or door stops.
2.
Connect the pump to the copper pipe. Secure the pump in place.
3.
Connect the flexible pipe to the pump.
4.
Place the glass tank in its cradle with the open end projecting 2cm over one end.
5.
Place the cradle on the supports with the open end over the plastic tank.
6.
Connect the flexible pipe to the copper pipe in the flume using a jubilee clip.
7.
Place the glass gate into the slots at the top end. Fill the area behind the glass with the
pebbles.
8.
Fill the plastic tank three quarters full of water and start the pump.
9.
When it all is working add the sand to the plastic tank.
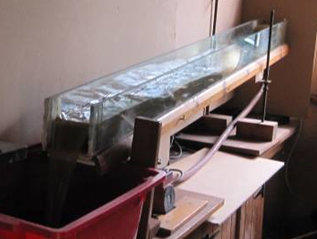
View of flume. I used an adjustable metal support for the top end but it was not very
satisfactory. Wooden blocks would be better for adjusting the height. A single long base
board would be better than the arrangement shown in the photo.
Top end showing the glass strips and the gate and the pebbles behind.
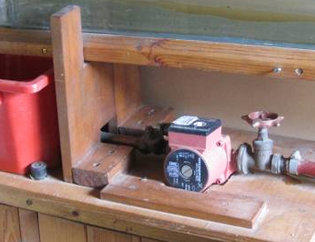
Plastic tank, support and pump. The gate valves are not necessary.


Earth Science Activities and Demonstrations